Docking Dauntless at Heritage Harbor, Wrangell, Alaska
We went to drop one crab and two shrimp pots. This video shows the last 15 minutes are we return to the Heritage Harbor, Wrangell, Alaska.
We back into our slip for the convenience being able to get on and off the boat via the stern and swim platform, plus it’s a little better for the shore power connections.
A few things to note: With a single screw and no bow thruster, Dauntless has always been a handful to get in and out of tight places. But as time as gone on and I’ve bounced off enough objects, I am pretty skilled at backing her up. She has a left-handed prop, meaning the prop rotates counterclockwise. This causes a produced prop walk to port, I have to keep about 3° of starboard rudder to go in a straight line.
She can turn 180° to port in about 60-foot diameter but turning to starboard can be problematic as I discovered one day while trying to turn on the River Maas in the Netherlands. While the current was against me, a 30-knot wind from our stern made turning around to starboard impossible as I discovered halfway thru the turn. The bow just stopped coming around. Luckily, at this point, I had plenty of room to turn the other way.
A couple of hours later, having already forgotten what I just learned, I tried again in a small harbor to dock into the wind. (See the picture below ) To my horror, as the boat crabbed upstream and towards a boat tied perpendicular to the dock I was trying to reach, I rammed the dock with the bow, knowing that at least then, it would stop my progress towards this other boat 60 feet away.
Dauntless in Nijmegen. I had come on on the left (side of picture) to turn right to dock as you see, but wind was blowing 30 knots from astern (on the bow on).BTW, this was with a working bow thruster. Another reason I learned it’s best not to depend on one for when you really need it against high winds or current, it will be least effective.
Lesson learned.
Now when you see me make a 270° turn to port coming around to 90° to starboard from our original heading, you’ll understand why I take the long way around.
A look Inside at Dauntless, a Kadey Krogen 42, built in 1988
I’ve been asked to give a little tour of Dauntless. Built in 1988 by Kadey Krogen, designed by James Krogen, this 42 foot boat has been the best economical paggagemaker of all time.
With two cabins, one mid-ship portside, the main forward, each with a head & shower. A very efficient boat inside and out.
Safe in towering seas, she just rolls along no matter what I ask her to do.
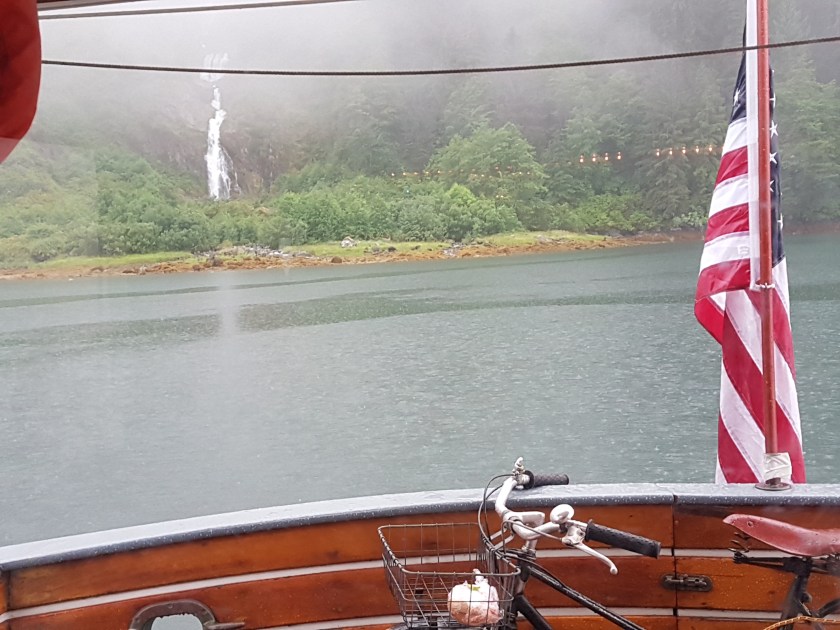
Anchoring at Kutz Inlet Waterfall, Inside Passage, BC
Highlights of this day include:
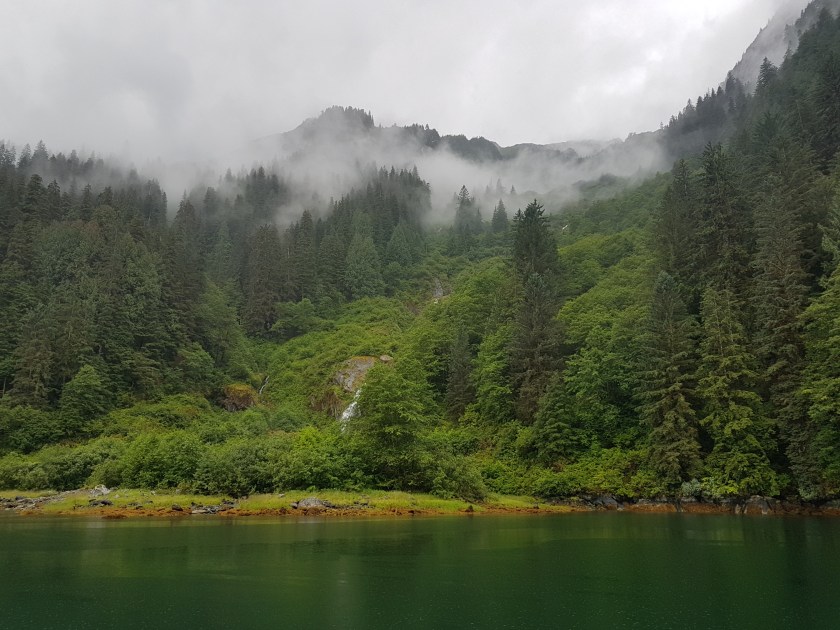
Another beautiful day on the Inside Passage in British Columbia.
Passing thru Sloop Narrows, Klemtu Passage
Anchoring in front of Kutz Inlet Waterfall
Having to re-anchor because I had anchored on a steep underwater slope, so suspected the holding would not be good. It wasn’t.
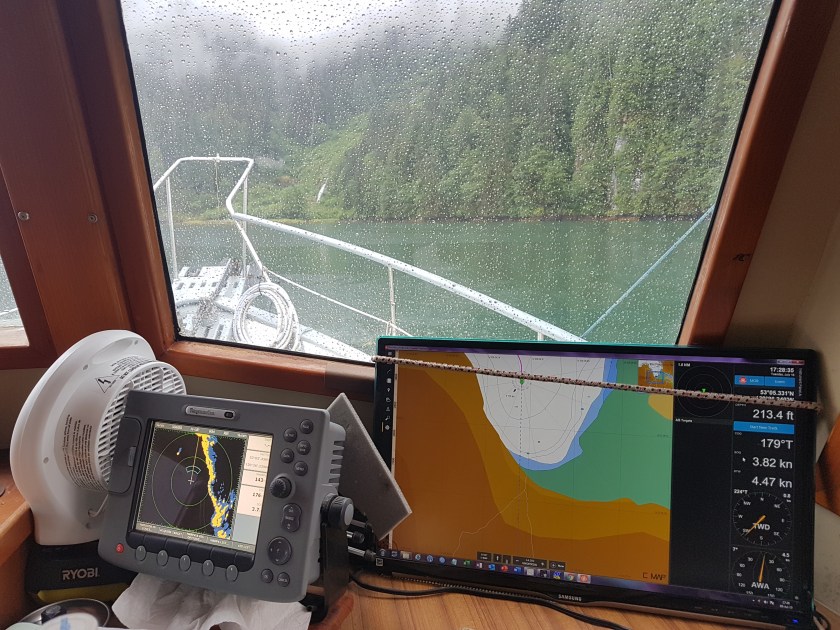
Our first anchoring was at 17:46. We were anchored in 20’ to 32’ of water, as it was a steep slope. I suspected the anchor had not set on that slope, so I watched it carefully. Here is what I saw:
17:46, Initial anchor bearing 48’@ 142°, depth under the keel, 32’
While the anchor was holding, I no longer liked the spot we were in. There were now two other boats in the anchorage, and they were more than a ¼ mile away. Maybe I better join them?
So, we moved. At 18:46 we were anchored in a new spot, much further from shore, but still on a slope. Bow anchor bearing was now 72’ @ 248°, I had 90’ of chain out in 40’ of water. I decided to put the stern anchor out. It’s a plow anchor with 10’ of chain and 300’ of nylon rode. This was just in case the bow anchor was not well set on the slope it was on.
For the next two hours I watched it. With two anchors out, I used the waterfall itself as a reference. The distance did not vary by more than 15 feet, I felt this was OK. Though our depth under the keel continued to lower as the tide went out. And because I had two anchors out, I did not have much scope on either line, with only about a 100’ out for each in 30’ of water.
But I wasn’t worried and with 12’ under the keel, I went to sleep, planning on an early departure the next day, so we could get to Prince Rupert, BC in two days.
I slept so very well. In my first years anchoring, I would awake every couple of hours, lay in bed feeling the motion and within a minute, convince myself that we were float free and clear. I’d then check the anchor alarm (Drag Queen), notice that it had turned itself off, so would get up to check that all was good. It always was good. In other words, my imagination was worse than the reality. I then go back to sleep, only to repeat the process a couple of hours later.
By years 3 & 4, waking up became less routine on the hook, as my 55# Delta anchor never dragged. Though I would still check occasionally in the worst weather.
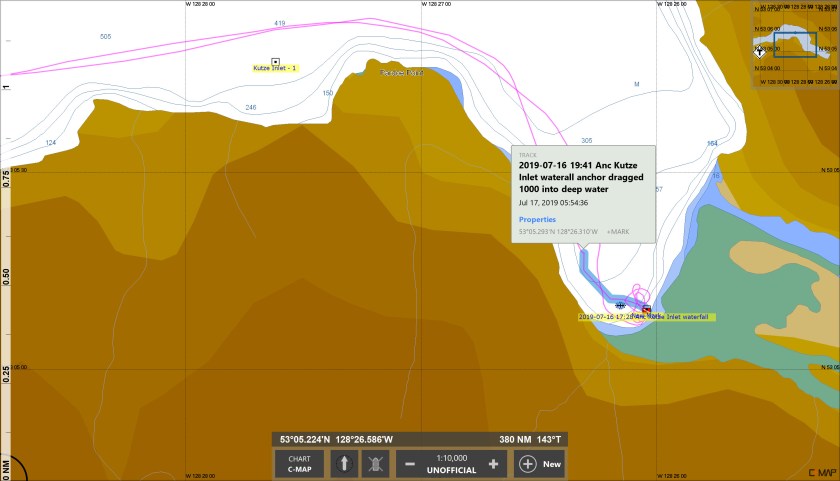
This highlighted track shows the route we took when Dauntless got impatient and left.
In the last couple of years, I’ve become even more relaxed about anchoring. Having used the anchor alarm in years, mostly because I found it only went off, after I took the dingy to shore and was walking downtown. Additionally, my first-year anchoring miscues were not so much about the anchor dragging, but me anchoring in the wrong place with not enough water under the keel at low tide.
I wouldn’t call it complacent, I was finally just comfortable anchoring, knowing my boat and anchor. To a point where even last month, on our trip to Juneau, we had to shelter from a first storm in Farragut Bay. We anchored in a little cove that I had anchored in two times previously. While it was a lee shore, in that the wind was pushing us towards the shore just behind the boat.
All thru the night, Ti would wake me up every 20 minutes to tell me the wind was blowing as the boat rocked back and forth. The first time I did get up to check, but with 40 knot winds and rain, I couldn’t see anything, but could tell from the chart we were 172’ from the anchor, just where it was when I went to bed. I didn’t get up again.
Writing about this now, I will make my next video of this day, so you can see the charts.
Back to our story.
I woke up at 6 the next morning and almost always immediately upon waking up, I would get up and do a quick check even before I put any clothes on.
This morning, I knew we wanted to get underway, so I figured I’d take the 10 minutes to do my morning toilet, get dressed, then haul anchor, get underway and make coffee.
That plan worked so well.
So well in fact, that I even went into the engine room to check the oil level before I came up to the pilot house. Larry was still sleeping in his cabin, when I looked out the pilot house windows and noticed we were already underway!
We were a ¼ mile from where we were the previous night. I can determine from the Coastal Explorer track that we started drifting about 02:00, so in 4 hours we drifted a quarter of a mile down the inlet about ¼ mile from shore with depth now more than 200’
I figured Dauntless was in a hurry to get underway, so I obliged her.
Hecate Strait to the west. The magenta line (on the right) is the route we took up the Inside Passage
20190715 North on the Inside Passage in BC, Bella Bella to Mouat Cove and onward thru Reid Passage.
The chart shows why the Inside Passage is so special, sheltering one from hundreds of miles of open Pacific ocean swells and waves.
Highlights of this day and a half include:
Another beautiful day on the Inside Passage in British Columbia.
Anchoring in Mouat Cove
We take the dingy for a short spin
Departure from Mouat Cove
Going through the narrow passage of Reid Passage
Mouat Cove
We took the dingy out to explore Mouat Cove, a beautiful little stop about midway along the Inside Passage. We managed to not hit any rocks, wither with the dingy or with Dauntless.
On these two and a half days, 13, 14 and 15 July 2019, Dauntless continues her northward trip up the Inside Passage in British Columbia to Alaska.
Highlights of this day include:
We race the Alaskan Ferry Columbia
We have a freshwater leak that empties our only full water tank
We stop early to rebuild the water maker, which only takes about 4 hours, only to discover that it didn’t solve the problem
Each day was 65 nm in 9 hours and 30 min on the 13th and just over 10 hours on the 14th.
First half of day 3, was just from Sea Otter Inlet to the Bella Bella dock where we hoped to get water for our freshwater tanks.
Low lights consisted of us spending 6+ hours rebuilding the Katadyn watermaker high pressure pump only to discover it did not solve the problem of the oil seal that was in the electrical motor portion of the water maker.
Upon close inspection, I had suspected as much before we started, but I was hoping for one of those boating miracles that was not to be.
For some reason, there does not seem to be a lot of places to stop and get fresh potable water along the BC portion of the Inside Passage. The cruising guide did seem to indicate that water was available at Bella Bella, so that was our destination on the morning of the 15th.
Once docked, we found the hose, but it took me 15 minutes to figure out how to turn on the water. The valve was hidden just beyond alittle gate that made it difficult to see.
Once that was done, we filled both tanks and got underway to anchor for the night a few hours north in Mouat Cove.
The tile says it all. This is the 12 July 2019 cruise on Dauntless northbound the Inside Passage in British Columbia.
Highlights of this day include:
We see a small whale
We see numerous whirlpools, but don’t get sucked in
We pass a number of southbound cruise ships, including the Nieuw Amsterdam and the Alaska Ferry Kennecott. ( I have a fondness for the Holland-America line, as I grew up across the street from Pier 40 in New York, where they docked in the 1950’s up until the 80’s?.
We stop for three hours on the Campbell river to wait for the currents to change.
Larry corrects me when I say “Johnston” Strait not “Johnstone”. Made all the funnier for me because I should have known, having been once married to a Johnstone.
Our anchorage was pretty windy, with westerly winds of 20 knots gusting to 28. But we held well as we always do (well until a few days later, but that’s another story.
We left Vancouver BC for the last time at 7:11 on 7/11. I think it was a coincidence! It was a long, 12+ hr. day, but it’s the Inside Passage, so weather is normally not a factor.
Dauntless cruise from Vancouver BC to Savary Bay 11 July 2019
There was an interesting spot we (My long-time Alaska friend Larry was with me for the next two weeks) wanted to check out, Smuggler’s Cove and that turned out to be the highlight of the day. Truly tight and narrow, it was a bit stressful entering and even leaving.
We have some OK Go-Pro footage of that excursion, though the Go Por was fogging up, so it’s not as good as it should be. I also took some video from inside the pilot house of the charts, both my Coastal Explorer running C-Map and Navionics on my tablet.
After that exploration, it was another 7 hours until we stopped for the night in an open anchorage, just north of Savary Island. All in all, as easy day, filled some interesting tidbits.
You can watch the videos here on the Dauntless at Sea You Tube Channel. The Smuggler Cove entrance is very tight and the conversation between Larry & I is interesting. Vancouver BC to Savary Island with tour of Smuggler Cove
Larry has been on Dauntless crossing the English Channel, Leaving Cabo San Lucas and the Mexican coast northward and now from Vancouver in the Inside Passage. This latest cruise was the easy compared to the rough sea we experienced off the Mexican coast and in the English channel. Those videos will get uploaded after I finish the Inside Passage 2019.
When I wrote Surviving Winter on a Boat back 8 months ago, in mid-January 2020, we were coming thru the coldest period we would see all winter, and everything had worked as advertised.
It was not to last. In fact, two weeks later, we had no heat and then no electricity.
Let’s check the videotape.
We are in for a period of really cold weather, at least for Southeast Alaska, with temperatures going down to zero (F) by early next week and staying in the single digits for a week or more.
Wallas DT40 heater in the engine room, the exhaust pipe is on the top middle, hidden behind the black muffler.
And it did get cold. January temperatures went below freezing in the morning of January 1st, were in the teens in the second week and single digits mid-month. Through it all the Wallas DT40 heater worked well and keep Dauntless warm and cozy, as I wrote last January:
I’ve had to turn up my Wallas heater, no longer content to leave it on the minimum setting. On its thermostat scale of 1 to 5, 1 being the minimum, I now run it at 2 to 3 at night and 4 to 5 in the day. That keeps the salon in the mid-60s in the day and the forward cabin mid-50’s at night. That OK to sleep, since I also have a mattress heating pad that takes the chill off the bed before bedtime.
At the coldest, with lows near 5°F and daytime highs in the low teens, the Wallas used 2 gallons of diesel per day if I ran it on high most of the time. During normal use, basically for the rest of the winter and spring, it averaged about 1 gallon per day, which is right in line with what the owner’s manual states. It’s certainly refreshing to have a company provide real data that hasn’t been lawyered to uselessness.
And then it warmed up and everything went to hell in a handbasket.
On January 20th, the temperature went above freezing for the first time since the cold snap has started a month ago.
What’s Hell in a Handbasket? Mix cascading consequences with trying to be a little too cute and a dash of inattention and you get no heat and soon no electricity.
It all started so innocently enough.
Back in the fall, when I had finally completed the installation of the Wallas DT40 heater (Wallas Finland Heater homepage) the 9 feet of 1” stainless steel exhaust hose ended in my propane locker. That didn’t seem like a good idea even to me, so I went to the local hardware store and got 3 feet of 1 ½ “ mild steel flexible hose because that is all they had.
I can make that work and I did. Nothing a little duct tape won’t solve. I was even proud of myself for making a large loop, in which I even thought to drill a hole for condensation water drainage. Too small a hole as it turned out.
All went well for months, until the warm-up in late January. The Wallas turned itself off and would not run.
Knowing that water in the exhaust could be the culprit, it was the first thing I checked. But that was easier said than done. The Wallas heater is installed on the starboard side of the engine room, above the battery box. The exhaust hose runs straight up to the salon to the fly bridge. I wanted to blow thru the exhaust hose. First, I had to take the heater off its mount. Then I hooked up the vacuum hose to blow and connected it to the exhaust.
It worked. I had also seen that my drain hole in the “U” of the exhaust pipe had sealed itself due to rust. So that’s why the ice and water had collected in the exhaust and when it got warm outside, the ice melted and the heater was on a low setting, so the water eventually clogged the exhaust causing the automatic shutdown.
The best laid plans of mice and men…
I drilled a much bigger drain hole, ¼” this time.
The heater started up and ran for 9 hours before shutting down for some problem. Strange.
I started it up again, and again it shut down after about 9 hours.
Just wonderful people and truly knowledgeable. Bill is the resident expert and he was so helpful. I ended calling them a dozen times over the next week, as I would take the Wallas down and clean out the burner. It would then start, run ok, but shut down at some point on its own.
Scan Marine suggested I send the unit to them. But I wasn’t ready to quit yet.
When cleaning the burner, three parts are removed:
The glow plug which starts the fuel burning,
The fuel pipe, a 1 mm metal pipe that drips fuel into the burner
The thermocouple which measures the heat out put to make sure fuel is shut off if there is no fire.
I had cleaned that little 1mm fuel pipe numerous times, since it will clog if the burner gets sooted up, like with a semi-blocked exhaust!
I had spent what seemed like hours in the engine room, holding the exhaust pipe, checking if it was getting warm, then hot. By then I knew every little noise it made. The minute ticks of the fuel pump, the fan blowing in the burner, etc.
I finally saw a pattern. It was starting ok, fuel was going in, it was burning (since it was getting hot), but then it would shut down, like I had turned it off (though I would get a warning that it had an unusual shutdown).
As I thought about its operation: it was getting fuel and air, but it was turning itself off.
Finally, at my wits end I went online to see how I could test the thermocouple. Right away, I found someone who had measured the resistance of the thermocouple at about 9 ohms.
Umm, mine was more than 2200 ohms.
Called Scan Marine and they told me the music to my ears, that anyone with no heat wants to hear: “Our mail goes in in 30 minutes, but I’ll make sure your thermocouple makes the pickup”
It arrived in Wrangell, two days later. J
Its resistance was 7 ohms. That boded well.
Put it in, turned it on and it’s been running normally the last 7 months.
Thank you Wallas for building a heater that is fixable.
Thank you, Scan Marine, for holding my hand through the process and then getting me the parts quickly.
Looking back, here’s what happened:
I extended the exhaust pipe, but then put too small a drain hole in mild steel.
With the heater running near high with very cold temperatures outside, the exhaust air was hot enough to prevent any water collection, even with the now rusted over hole.
As soon as it warmed up, ice melted in the exhaust ANDI turned down the heater, resulting in cooler exhaust, allowing water to collect, semi-blocking the exhaust, then blocking it causing a shut down.
In the process of cleaning the heater too many times because I couldn’t figure out why it wasn’t working correctly once I had cleared the exhaust, the thermocouple wire broke, but not obviously. Therefore, it would run, but as time went on, the wire insulation got a little warmer, allowing the wire to stop making contact at the break.
Once the thermocouple reported no heat due to the wire break, the heater would turn off the fuel pump, as to not pump fuel with no fire going (even though the fire was going).
Not the first time, in diagnosing one thing, I cause something else to break.
On the other hand, I love the Wallas and would buy it again if need be. It’s expensive, but worth it. It is as quiet as advertised. At night in bed, with the Wallas on high speed fan, I can not hear it, but instead do hear the muffin fan on the fridge compressor. The Wallas is that quiet, with it’s mufflers on the two hot air ducts.
The only thing that made this week with no diesel heater tolerable was having a mattress heating pad on our bed. It allowed us a decent night’s sleep in a cold boat. Don’t leave home without it
This is the 120v one that I have had for a year now and would recommend my 120v Mattress Pad. I hesitated getting a 120v pad because there are issues with noise in the transformer, they can produce a buzz that’s audible in a quiet room. This 120v unit has no noise at all.
Previously, I had used a 12v hating pad. The first one lasted 4 years and I loved it. It didn’t need an inverter to run and it really warmed the bed on cold winter days in New England and Northern Europe. So, when it started not to work, I bought the same one My 12v Mattress Pad. this one only worked for a couple of months before it too, started simply stopped working. So, I gave up on them. Stupidly, I should have returned the second one while under warranty, but for some reason, that never occurred to me.
Now, while we spent this week with no heater. I did have the two A/C reverse cycle units on the boat. They will provide heat. But we only had on 25-amp circuit to the boat. So that took some jury rigging to turn on one heater or the other.
Worked fine until I also decided to install an Automatic Generator Start that same week.
Here is the link to my You Tube channel, Dauntless at Sea, where I just uploaded some pictures and videos of the day 08 to 10 July 2019, Vancouver B.C., to Montague Harbor, where I anchored to meet some wonderful Kadey Krogen friends.
Here is the link to my You Tube channel, Dauntless at Sea, where I just uploaded some pictures and videos of the day 06 July 2019, Bedwell Harbor to Vancouver B.C., where I anchored in the middle of town, in False Creek.
After some fits and starts, I am keener than ever to be more consistent and use this Dauntless at Sea to spotlight the photos and videos of the last 7 years and 30,000 miles. I will also try to be consistent in showing entire seasons or passages in a short time.
I will bounce around a bit but will have the date time group in the format, yyyymmdd, in every title, so should you want to watch them in chronological order, it is possible to do so.
I have far more pictures than videos, for a number of reasons:
There is not a lot going on during long passages, one picture can tell the tale at a glance, as opposed to watching hours of videos showing the never-ending ocean
During the most exciting times, I was often hanging on for dear life, literally. I could justify a quick photo, whereas trying to hang on for a few minutes in big seas, with the boat rolling all over the place, knowing that if I went overboard, that is all she wrote, to take a video was beyond even my level of risk taking.
Currently, I am thinking that I want to finish the trip up to Alaska, then returning to the beginning in 2013, with some current Alaska stuff thrown in.
Feel free to leave comments, suggestions and whatever.
This entire spring, I have been dealing with electrical power issues, of course, like usual, mostly self-imposed. My Kadey Krogen 42 is a really well designed, well-built boat, but for the nut behind the wheel, all would be perfect.
This is what’s been happening.
Batteries. My four Yuasa 8D Sealed Lead Acid batteries, bought in Ireland 4 years ago, are shot. Each battery is 225 amp-hours (AH) but are down to about 10 AH each! That means that once 40 AH are out of the entire bank, the voltage crashes to under 11 volts.
The battery that was replaced.
Last fall and again this winter, hoping it was just one battery gone bad, pulling the others down, I separated each battery, let them rest and then checked each voltage. Normally it’s a good sign that they were all within a couple of hundredths of a volt, but in this case, it just affirmed that the entire bank was shot.
My first solution was to get and install an Automatic Generator Start (AGS). I found a Magnum on Amazon. An AGS starts the generator automatically at a certain voltage, in this case 12.0 volts. Once this was up and running, at least I didn’t have to wake up every three hours, check the voltage, go back to sleep for an hour or two, then get up to turn off the generator.
The AGS SetupThe replacement cells
Now, the gen would come on automatically, run for the time I had set, in this case one hour. That would put enough charge back in the batteries for the next few hours.
The installation was relatively complicated because of my Westerbeke gen. It required using two additional relays (the AGS itself is essentially three relays).
About his time, somewhat unrelated to the batteries, I managed to short out my Heart Interface b y doing something really stupid.
We were connected to one 30-amp shore supply. To make life easier, I installed a jumper breaker switch so that I could power both circuits of the boat from the one source. It does mean we must manage our use, so if making hot water in the electric kettle, we must turn ff the water heater which itself uses 10 amps of 120 power.
I managed to blow up two of the mosfets in the Heart inverter by forgetting to disconnect this jumper or disconnecting the shore power, when I went to start the generator.
So, I was also in the market for a replacement inverter. I wanted a pure sine wave inverter to be able to run by 120v heating pad on my bed.
I ended up deciding on MPP Solar Inverters, I got two 1,000-watt inverters that normally run in parallel and thus provide 2,000 watts as needed. I can also sun them singly, giving me back up if needed. Also integrated into each unit is an 80 A MPPT solar panel controller.
The Li battery is under the black rubber protective cover lower right. one od the older 8Ds is in middle. MPP Inverter/Chargers are on top.
On the battery side, I decided to try ONE LiFePO4 chemistry battery, that I would put together myself using four 3.2-volt cells (each 200 AH) and a Battery Management System (BMS). Total cost for the four cells, shipping and BMS was $600, though it took two months by boat from China to Seattle, then barge to Wrangell, Alaska.
The battery was relatively easy to set up. I’d spent much of the winter watching Will Prouses’s videos on YouTube and reading his forum.
From the forum, in the marine section, I found the solution to the issue of an abrupt battery shutdown by the BMS, possibly blowing up the diodes in the Alternator or Generator.
The easiest solution seems to be to keep lead acid batteries in the system. So, in my case, I took out only one of the 8D’s and replaced it with the Lithium battery.
The naked battery before coveringThis is how I got that 100 lb 8D out of the engine room, without breaking my back. I used the winch on the boom from the fly bridge.
The new setup has been operational since June and has worked well and as anticipated.
I had to set a user custom charging program for my Balmar ARS-5 regulator. I also added a temperature sensor for the regulator to know the temperature of the alternator. I set the bulk charging to 60 amps and 120 minutes at 14.2 volts. Absorption I set to the minimum 6 minutes and Float to 13.3 volts.
Works like a charm. If we are on the hook, 12 hours overnight uses about 110 to 150 AH. Once we get underway, the alternator will put 60 amps into the batteries for the first two hours, then go to Float. LiFePO don’t like being kept fully charged, so the Float at 13.3 keeps them about 85 to 90% capacity while underway.
The MPP Inverter/charger works somewhat the same, but at least for now, though I did have to change the Bulk charging voltage from 14.2 to 14.6 volts to get it to go into Bulk charging if the batteries are at 50% since the voltage at 50% stays relatively high at around 13.00 v.
With this set up, now when out fishing for the day for days, we just run the generator for an hour or two in the morning and maybe one hour in early evening.
It’s amazing how what happens or doesn’t happen on the boat can make such a difference in my mood.
In some weird way, I am not that competitive with other people. In fact, in the workplace, I have always been a total team player, giving credit even when it isn’t due to others and being oblivious when it turned out I was the ONLY team player.
But I am very competitive with myself.
I beat myself up badly when things don’t go as planned. If I fix something that doesn’t stay fixed or can’t figure out what the problem is, leads to many sleepless nights.
It’s even worse when in trying to solve one problem, I cause another. This pretty much sums up my last 4 weeks.
But before we talk about that debacle, let’s talk about a little success.
Jabsco sea water pump
Last year, I decided that one of my projects was to solve the leaking Jabsco Impeller pump issue.
It was leaking from the cover and because of its location, it leaks right on top of the steel engine mount frame that sits on the stringer. Saltwater on steel is not good.
Not a bad leak, like a drip, drip drip. The sea strainer had a similar leak from the top gasket. Annoying in its own way, because the route for that water was all the way to the front of the engine room on the outside of the stringer, thru the limber hole located there and then back to the bilge on the inside of the stringer.
This constant wetness causes mold and keeps the engine room damper than I like.
Sea strainer with new gasket
My attempts to stop the leaks only made them worse.
On the other hand, I had not had the impeller cover in more than two years. I’ve never really had any impeller problems.
I decided that this winter in Wrangell was the time to get these long-term problems done once and for all.
First step was to take the entire Jabsco pump/gear off the engine. That was relatively easy, though it took a call to a friend to confirm that I needed a little brute force disconnect to free the pump from the engine. A whack with my rubber mallet did the job. (I thought this was rather obvious and I hated asking someone, BUT I’ve had those thoughts before, and disaster ensued. I decided it better to be safe than sorry).
Took the pump to the local guy Tyler, who like before, took my little job of resurfacing the face and the cover of the bronze pump. I appreciate his doing so since his main job is making propeller shafts and very big bearings for the bigger boats and fabricating other things from stainless steel.
$20 later my pump was done, and I took it back to Dauntless.
Old drive shafts that have been replaced by new
Only took me a quarter of an hour to put it back on the engine. While this was going on, I also changed the anodes on the main heat exchanger and made a new neoprene gasket for the sea waster strainer.
A quarter of an hour is a bit of an exaggeration, in that it took me another week to find the neoprene gasket material that was stored someplace in the engine room. In my digging, I found some thicker material that was even better and moved the neoprene to a location where I would be able to find it easier. It did NOT need to be stored with those engine parts I will probably never use, like water pump, starter and Alternator.
Once everything was buttoned up, I started the engine, first letting it turn over for 15 seconds before actual start.
It felt so good to have the engine running again. This engine has gotten me over 25,000 miles in the last 7 years. I know it will never let me down.
The relief that flooded over me was unexpectedly powerful. No water leaks, no oil leaks when the pump is mounted to the engine. All was right with the world.
Now my bilge is relatively dry. Now I really don’t want a totally dry bilge. I like my bilge pump to activate a few times a week. With the slow drip from the stuffing box, the pump will go on for a second about twice a week.
With constant rain, it will go off once or twice a day, as water gets in the lazzerette hatch drain gutters, even though I cleaned those gutters and its drain.
Frequently use of every critical part or system is the best preventive medicine. That way when problems crop up, they are noticed immediately. A month ago, while I was having my heater issues (more on that next time), I turned on my forward A/C unit for the first time in more than a year. Of course, no joy.
It took a day of tracing wires and breakers before I finally found the main power plug under the helm had become disconnected. I would have found this much sooner had I been using the unit more frequently. But as happens, over a long period of time, as I change one thing or another, my first thought is that one of those changed was the problem. Therefore, I spent a lot of fruitless time looking at non-obvious stuff, before I found the simple solution.
So, that’s why I like an almost dry bilge. I want to know right away if there is a problem. If the bilge pump or level float (which triggers the pump) stops working, I will know in a few days or week, when I see more than a few inches of water in the bilge.
If the bilge was totally dry, I would never know, until I possibly had a major water inflow and then I would have to fix the problem immediately.
Use it or lose it.
Coming up next, the Wallas debacle or how one problem led to a bigger (more expensive) problem.