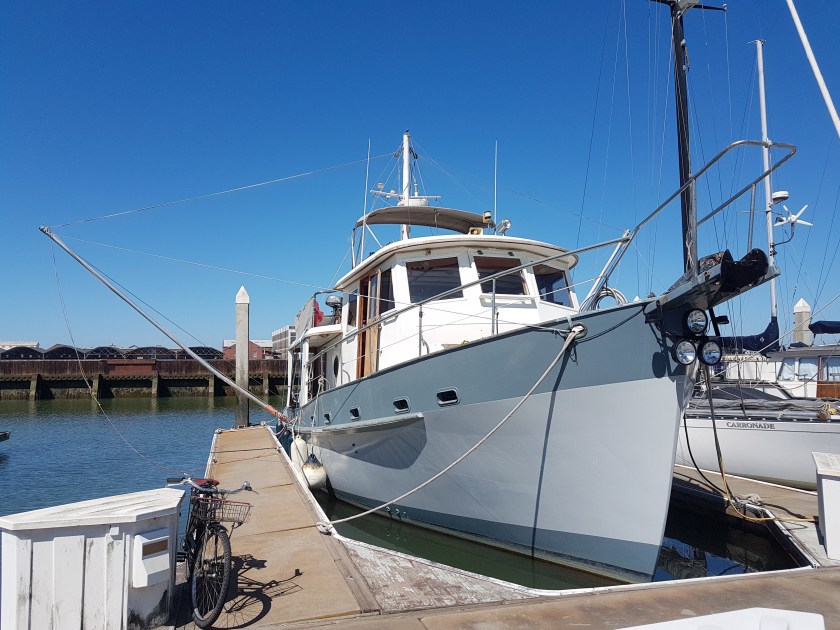
Just finished checking the rigging for the paravane pole and bird.
I’ve been ready to leave Vallejo for a month now. This is getting old. But I have vowed not to let myself be beat up any ore than usual.
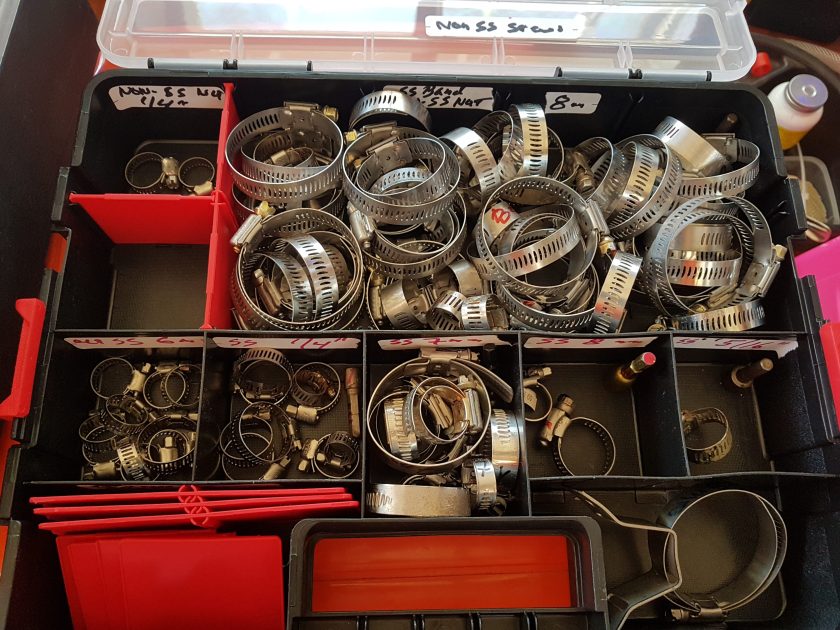
I spent much of last week organizing parts. I thought I had only two types of hose clamps, stainless and non stainless, which I separated last year. If only life would be so easy.
As you can see from the attached picture, I have essentially 7 different stainless-steel hose clamps and guess what, that large bunch in the back of the organizer all have stainless bands, but non stainless screws! That’s totally worthless. I wish I could be sure that that bunch was not Made in America!
My 7 types of hose clamps
And they are also organized now by the size of the screw: 5mm, ¼”, 6mm, 7mm, 8mm. this allows me to easily use the same size for any particular job, as opposed to discovering that the dual clamped sanitary hoses have two different sizes of nuts.
I’m now doing things that were not on the list, like measuring the paravane bird rigging. When we left Martinique, 5,000 miles ago, I had the birds set to run 19 feet below the water surface. that’s 5 feet deeper than previously, as I finally realized that in larger seas, waves greater than 10 feet, the bird itself was being picked up in the rotor of the wave, negating much of its effect.
Stbd paravane pole with double loop proving a quick extra 10 feet of depth should conditions require it.
Since Martinique all has been good on that front. Now, I made sure of the depth and also marked the poles. In addition, I re-rigged the extra line, so that I can quickly run then 10 feet deeper if the situation, really large seas, warrant it, without stopping or even slowing down. With the re-rigging, I just have to take out a few clove hitches and the extra 10 feet is free.
Here is also a before and after picture of the driving lights. They are handy when anchoring in strange spots with other boats or mooring buoys around. I’ve also used them in dark, narrow, lonely channels. T
here have been a few too many of those.
My long term filter carton is a bit depleted. I have already taken out my last 6 Racor 2010 filters. I keep them in the engine room by the Racors.. I have only half a dozen Racor 2050 filters left for my fuel polisher, as well as a number of engine mounted filters, along with some water sediment filters for the water maker.Driving lights off
Driving lights on. I only use them for anchoring in unknown places or in narrow, but marked channels.
Yesterday, I completed two things on the nice to do list: replacement of the Raritan water heater anode and replacement of a terminal block for my 120-volt neutral circuits in the engine room distribution panel.
The new anode is on the right
After two months, I’ve finally hit my stride and actually feel confident in what I am doing. That manifested itself in those two completions yesterday. Instead of taking a couple of days, they took a couple of hours and I didn’t have to redo anything.
This got me to thinking about a job interview I had just the other day. I found myself talking about the importance of not overwhelming students, especially students who may be far being in whatever work that needs to be done.
I mentioned in the interview that even when a student was far behind, let’s say they need to complete 20 projects or work assignments by years’ end. It’s already February and they have nothing done, with only a few months to go. It’s easy for a teacher to just be upfront about it, if you don’t get these done; you’ll fail.
I’ve seen teachers do that countless times. But it won’t accomplish the stated goal of getting that student to be successful, (though it does make the class smaller). If a student sees a mountain of work to do, they never get started, discouraged, not seeing how they can get it all done, they give up before they even start.
That’s me, now and then.
My driving lights are lighting up that sailboat
So, two months ago, when I made my list of the top half dozen things to get done before departure, I knew the last was far bigger, but I couldn’t overwhelm myself. I didn’t want to paralyze myself with indecision. Now, I know many of the readers here are successful boaters because they just see what needs to be done and get to doing it.
In the same way half of all students are impervious to the adults in their lives who get in their way, be it parents, teachers, or anyone else. They’re going to learn and be successful no matter what. It’s not by chance that the historic graduation rate in the last 50 years continues to be about 50 to 60%.
I’m not in the group. I needed a teacher to be able to at least steer me in the right direction or a teacher who could tell I was bored to death and challenge me in ways the curriculum didn’t. The same way a good teacher will give make-up work to a student in a piecemeal fashion. Do this for me tonight and I’ll give you something else tomorrow. At the same time scaffolding the rigor of the work. So, in a short time, they are whipping out stuff they never thought they could do just weeks ago.
Two months ago, starting with a list of 6 items, I knew I’d do more. I’ve done three times that amount so far. While moving the instruments on the mast, I knew to check the paravane fittings. The clevis pins needed to be checked and I wanted new cotter pins. I also noticed too much wear on the main fitting to the mast, so I needed to add some washers and new pins.
As I did more and more, sometimes taking a week to complete one checklist item, but I also did another half dozen items, that were not on the checklist. I became more confident.
Confidence is the other side of the equation. When I finally completed the LED project, which involved 4 wires, with four conductors each (a positive, and 3 separate grounds that control the three colors, blue, red and green), I was very pleased to see it all worked as anticipated. I had three switches to turn each respective set on or off, plus three additional switches to control the colors, since I figured I didn’t need any complicated controller.
That it all worked, gave me the confidence to tackle the 120v terminal bar, that seemed straight forward, but you never know. When that went well, without me having to redo stuff, I tackled the water heater anode and that went even quicker.
The order I tackled these projects mattered. I have read education studies that when formulating a test, the order of the questions can make a significant difference. The same questions in a different order can make a significant difference in student performance. Teachers have known this forever. If you put the hardest questions first, it discourages students. Why a teacher would do that is a story I will save for the book I’m thinking about writing. But it also goes to our overall 60% graduation rate.
When I took the test for my NMC Master’s license, the lights and signals test was the hardest for me. It was hard enough to remember red over green. Was that fishing or trawling or neither? But the day shapes were even harder for me, since I was not using them myself.
For a week I took practice tests. The passing requirement for that portion of the test was the highest at 93+%; meaning out of 33 questions, you could only get 2 wrong.
During my practice tests, I got anywhere from 65 to 80% correct. Well off the mark.
Test day came up and we took the other three portions of the test first that were easy for me. Then the dreaded lights and signals. The first 5 or 6 questions were “easy” in that I was sure of the answers. By the end of those 33 questions, I was positive that I missed only one!
Well, I missed two, but that was still enough to pass. I was elated, but I also recognized that the question order made a significant difference for me that day. Because I felt confident in those first half dozen questions, I didn’t stress and overthink the rest.
In the same vein, when I started working on the boat projects, I knew the order made a difference.
Since I whizzed through those two things yesterday, I decided today to tackle the Purisan project. Two months ago, I’d not even mentioned it because …
But now, it’s almost done, but that’s for tomorrow’s story.
I think it was time for anew anode for the Rartitan Water Heater
Slowly, but surely progress is being made.
I have completed the following:
Installation of outside LED rows and inside wiring, Amazon LED Link
The drving Lights on new brace with new brackets
Added another power line for the pilot house electrical panel and also added an additional ground,
Replaced the terminal block for the 120v system neutrals in the engine room distribution panel,
Replaced the anode for the Raritan water heater that I didn’t know existed until a few weeks ago,
Replaced the brackets for the three driving lights and replaced the two fog lights with stainless steel brackets I had made in Vietnam,
The fog lights are pointed down: to see the chain coming up and to make the boat more visible by lighting the hull, if I’m anchored in a busy area.
Tightened the thru bolts for the paravane pole brackets; replaced all the cotter and clevis pins with new stainless steel.
Closeup of the double row LEDs in the clear rubber jacket that makes them truly waterproof (we’ll see)
installed a set of fog lights to the spreaders,
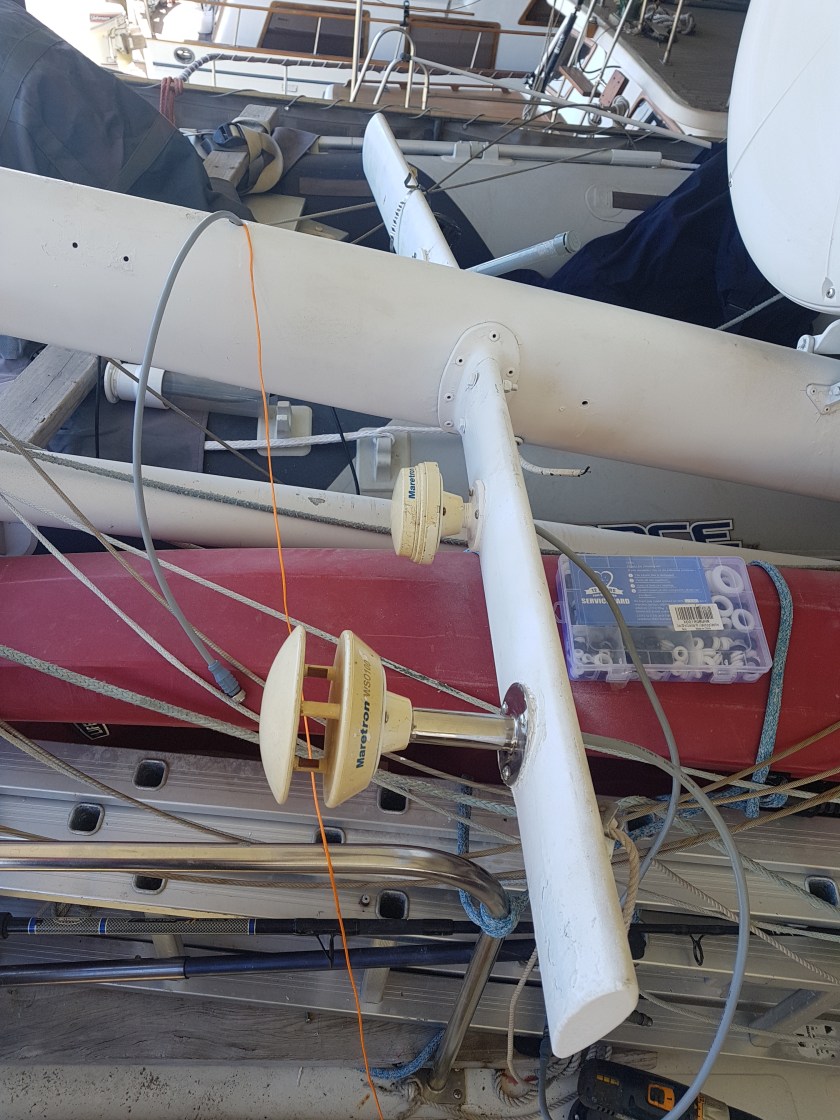
Moved my Maretron weather instruments, GPS and my Groove WiFi extender to the spreaders on the mast,
The old terminal barLEDs as blue
The LED lights white. Can also be red, green or blue
Repaired (at the last minute before replacement) my 12v heating pad for my bed that is 5 years old and stopped working a month ago. Just before I went to buy anew one, I decided to have one more go at fixing it. I did.
My rewardThe aft deck lit by the LEDS
I told you of my plan to add a 16’ rope of LED lights for my galley. I t had occurred to me that Dauntless is a bit dark at night in the salon and galley. While I have under counter lights, that do a good job when cooking or cleaning, looking in the cabinets are another story. I know where everything is or at least how it is organized, but thinking about Ti, everything on Dauntless will be new.
So, I decided to add those LED lights, but it as another project that started and then stalled. Last night, while in bed, I realized why I’d stopped.
My original plan was to just add the string of LED lights to the overhead dome light. Switch on the dome light (which I never use) and the LED lights would also light up, illuminating the upper cabinets and the spice rack. I had taken the light fixtures down, as part of the process and also got new warm white (2700°K) to replace the hot white LEDs I put in 5 years ago. Only in the engine room and these galley lamps (which I never use) did I put cool white LED’s (6500K). They are pretty ugly in the galley, so I am changing them just in case someone does turn on those lights.
I was so proud of myself; if only it had been the correct set of lights!
Ti’s given name is Trinh, pronounced Din, rhymes with tin. Her childhood name and the name her family and friends call her is Ti, like tee or tea. In this last year I realized that it’s just easier for all concerned to say Ti. She was called Ti because in Vietnamese it means, small, like a mouse. She is small, like the runt of the family, at just under 5 feet. So last night in bed, it finally dawned on me that she could never reach the light without a ladder.
That switch is on the ceiling, 7 feet off the floor. I can reach it, but Ti will need a ladder. Now, I know she would never say anything, but still, I’ll put the new switch near the current one for the under-cabinet lights. That will be easier for everyone
I did finish one other project today. Last night I was excited to look at Dauntless with all her new exterior LED lights on, only to discover that the starboard side deck was still not connected. So, I got up this morning with that in mind.
Finally, the right set of lights lite up.
I was so proud of myself. The picture shows my handiwork. Went to the salon to turn everything on and to my dismay, still no lights, but even worse, the pilot house eyebrow lights were on.
When I started working on the lights today, I wondered why I had left the end wires so short. Well, I figured it out, they were the END wires, not the beginning wires. In other words, I had hooked up the end of the wire line that was on the fly bridge!
Another warning sign that I had ignored was that I had already led the wires down to the starboard side deck. I wondered why I did that but didn’t bother to look up and see the light pigtail that needed connecting.
The New Warn white LED bulb in the light fixture
A comedy of errors.
After fixing that, again pleased with my work, everything worked and then if you are eagle eyed you will be noticed in the attached picture that the wire runs outside of the aft stay for the paravanes. Luckily, I just had to untie that stay, but it also means that I will have to check its adjustment again once we get underway.
I certainly keep life interesting. But it also demonstrates how much easier everything is when you have a partner to ask you, why are you attaching the wires there, when it is wired on the other side of the boat already? Or Are you sure you want that line on the inside of that wire?
BTW, Does this look a person who is going to complain about he location of a light switch!
My New Fresh Tank Selector Valve to the left of the stairs
The words: a couple, a few, came in handy back in 2004 when I had to teach significant digits to my high school physics class.
While I’m pretty good in physics, meteorology really just being mostly math and physics, with a few fluid dynamics classes thrown in, I had to refresh myself (learn) about significant digits to teach it. As it turned out, it was the last year in was in the New York State high school physics curriculum, but I thought it important, so I taught it.
At the time I wondered why I didn’t it didn’t come quickly to mind as the other important concepts of physics did. Later, I realized because during my high school and university, I was using a slide rule and understanding how many digits were significant in any calculation was an integral part of it’s effective use.
Thus, I “knew” it, without knowing what I knew.
So, when thinking about this blog post today, I debated titles: Two steps forward, three back, no, I have made some progress, two forward one back, let’s not get carried away on the amount of progress, two steps forward, one and a half back, sounds awkward.
My New Fresh Tank Selector Valve with the stairs. The grey box on the bottom middle is my bus heater that really warms the boat when underway)
Two Steps Forward, a Couple Back about sums it up. Of my 6-item list I of last week, one, moving the fresh water selector valve is done, but now instead of 5 things left to do, I’ve already discovered a dozen more. I’ve already taken care of a few, like the hole I found in my stainless-steel sink (how does that happen??), but that still leaves me with half-a-dozen more.
Therefore, the ambiguity of “a couple” is perfect.
My re-positioning of the fresh water tank selector valve is done. Finally, with only a few missteps. In the process, I may also have found the problem with my fresh water pump. I had to replace the pressure switch back in the fall and at first, I taught all was OK, but then I noticed decreasing water pressure as the pump ran. For most of the winter, I assumed I had to adjust the pressure switch, but now I think I had a very small air leak in one of my older water hoses where it connected to the copper hose (and I put new hose from the output of the selector valve to that copper fitting).
I’ll know once everything is up and running and no matter where you live you will probably hear me laughing or crying in my shower depending upon the outcome.
I’ve also been working on a number of electrical/mechanical improvements:
Maretron intruments now on the spreader of the laid down mast
Repositioning the Maretron instruments on my mast, including running a new Maretron cable and re-conditioning all the connectors,
Moving my Groove Wi-fi extender to the mast also and running its antenna cable thru a new route from fly bridge to pilot house, as the old wire race is full to capacity.
Adding switches, replacing a fuse box, adding a voltmeter and rewriting my AM/FF radio in the salon.
Adding some LED lighting to the side decks (more robust and waterproof than my initial effort 5 years ago.
Pictures and results to follow.
My New Fresh Tank Selector Valve with the stairs. The grey box on the bottom middle is my bus heater that really warms the boat when underway.
Moving the mast instruments has been a drama. After finally realizing I needed to tap and die the bolts for the spreader since the aluminum is so thick, 3/16th, to ¼”, I was “pleased” to discover that while I have two metric tap and die kits, I have virtually no metric bolts or machine screws, at least none that were stainless steel.
My Tap and Die kit and the metric machine bolt assortment from Amazon.
So, I spent some days, just sorting my stainless steel and figuring out what was metric and what wasn’t. It’s amazing the amount of stuff I’ve accumulated that really isn’t suited for boat life, but I don’t want to get rid of any of it, because you never know what you may need in the middle of the ocean.
Having said that, it’s so strange to get my mind around that fact that for the foreseeable future I will be in range of Boat US or Sea Tow. More so because in my first year, going up and down the ICW, I had Boat US on speed dial. But now, having spent so much time and miles being totally independent, it’s a mindset that is not easily turned off.
Now for those of still waiting anticipation of learning about significant digits.
It means that no matter how many digits your calculator displays, you need to use your common sense.
e.g. I walked 2 miles (a couple) today. There are 5280 feet in a mile, therefore, my calculator tells me I walked 10,560 feet. But did I walk exactly two miles? Or was it 2.1 or 1.8 mile, one cannot know from the information
I love these warm, non slip socks. Pamisi on Amazon.
given.
5280 has 3 significant digits, 2 has 1 significant digit, when multiplied you take the minimum, therefore the answer will have one significant digit. So, even though the calculator says 10,560 feet, the answer with significant digits in mind is 10,000 feet (rounded off to the one significant digit).
You can get a very nice definition and explanation here:
Last week I returned to Dauntless, but then took a 5-day trip to Anchorage to attend a teaching job fair. I figure as long as I will be in the USA for the foreseeable future, I may as well work again and put my winter time to constructive use and replenish the coffers.
I spent much of the winter thinking of what had to be done on Dauntless. Since leaving Ireland two and a half years ago, I’ve asked for a lot from my little Kadey Krogen, but gave her only fuel and oil in return.
But 30 months, 10,000+ miles, 2100 engine hours later, the poor girl needs some TLC. While I revised and improved things like the paravane stabilizers as time went on, some other things, like my solar panels, were ignored, though I knew I needed to change the wiring from the controllers.
I also didn’t need to, but thought it was time to change the location of my fresh water tank selector. Too many times, I’ve had to sneak into the occupied second cabin in the middle of the night, open the closet, pull up the floor board and change the water tank so I could take a shower. Since I’m working with water, I may as well also, change the selector valve for the water maker output.
It’s hard to see, but the re-charge fitting is at the very tip against the insulation for the copper tube.
So, I have a list of about a dozen improvements and corrections (to some older half-assed jobs of mine) to do. Plus, the normal stuff of putting away the clothes and accouterments of a “normal” life after merging a couple of households. Now, where to put those dozen suits?
I’d also come up with a plan as to not to waste money. I cook very well and like my cooking. I often eat out only because I like getting out, not because the food is better. In fact, often it’s not, yet expensive.
Day 1 of 60 days, the next two months, on my first free day, with the rental car that I’d picked up in Sacramento Airport the night before, and which had to be returned by 18:00 here in Vallejo, I would do my shopping at Costco to set me up for the next two months.
All goes according to plan, with only a little warning flag. The freezer only got down to 20°F in the first 18 hours. Usually, it is minus 5°. Did it just need more time, I wished and hoped?
You all know that hope. The hope that is not based on any reason or even history. It’s just a hope that you don’t have to deal with it
So of course, on Day 2 of 60, instead of starting my dozens of projects I’d planned, I’m dealing with stuff that isn’t even on the list.
Freezer temperature is still too high. My Costco ice cream is more like a slurpy. First thing I did was to look online for solutions. Not hard, and in fact, on Cruiser’s Forum, there was a really well written story of re-charging the Freon in (my) BD50F Danfoss compressor. Not so hard, just finding a coupling fitting will be a PIA.
I check out the re-charge fitting and I notice the first fly in the ointment. I’ll have to move the entire compressor to get at the re-charge fitting, as it’s tucked up against the insulated copper tube for the refrigerant.
My compressor is behind the freezer, under the pilot house settee. Getting to the securing screws require an agility I never had. Yet again one of those situations in which a trained monkey would be very valuable.
By noon, the compressor is moved enough to start phase 2. Finding Freon.
Taking my new acquired $60 bicycle, it was only 10 minutes to the NAPA store. Sure enough, they have Freon, but not the hoses or fittings to connect it. I buy a can in any case. (Why you wonder, without the hose??)
Then, as I am walking out the door, I realize that I still need the hoses and connectors, so I may as well go to the nearby Autozone. Said Autozone was much better equipped than the NAPA and not only are their prices lower, they have a number of options with Freon and hose together. I still needed an adapter hose to connect the car sized fitting to my bicycle style fitting used on the Danfoss compressors.
The Freon I found
They had something that may work, so I get that too, promising not to hurt the packaging so I can return it if need be.
Decide I may as well, return the Freon I got at NAPA. Apologize for that.
Get back to the boat and get ready to get to work.
As I am gently moving the compressor, trying not to make a small problem into a much bigger one by rupturing a coolant tube, I notice that the muffin fan that sits between the compressor and the radiator is not turning. I stick my finger in it to make sure and it’s still not turning.
Well, that will teach me to diagnose the problem on the internet.
Yes, Freon may still be an issue, but before I do anything, I need to get the fan working. There is no way I can take the old fan out without moving the entire compressor to a more assessable location.
But guess what? I have muffin fans! At least three or four!! Why? You wonder? Because back in the day, year one (as Asians would count it), the muffin fan went out in my inverter. The inverter overheats and shuts off pretty soon without the fan.
My job complete, The bottom back of the freezer is on the right
I bought 4 muffin fans online, they were advertised as being very quiet and would last forever. Spares are good. Of course, par for the course, once I took the old muffin fan out of the inverter, I realized the fan rotor had just fallen out of its housing. I just needed to glue it and put it back. It’s worked the last 5 years without a hitch. Though of course, noting is that easy. I cut the wires very short when I pulled it out, so of course, it took half a day to reconnect them.
But now, when I really needed one, I had muffin fans to spare.
I installed it on the opposite side of the radiator, so that it blows thru the radiator, the defunct fan and the compressor. I hooked it up to an external 12v power because before I went to the trouble of hooking it up normally, I wanted to make sure it was the solution to the problem.
Within hours the temperature of the freezer was down to zero. By morning, it was -5°.
I was good to go.
Now, at the end of Day 3 of 60, my to-do list is the same as ever and Alaska is no closer.
Since my first car days, driving around Mt. Rainier in the middle of the night, I have loved having extra lights on my car, driving lights. No video games, no internet, we didn’t pretend life, we lived life.
The New lights in Scotland in 2016. On the outside of the frame, you can make out the fog lights which are point down to illuminate the hull and anchor chain.
Fast forward 40 years and during my first year with Dauntless, I somehow found myself, cruising the ICW at night, a few times too many. Cruising at night in marked channels is so much harder than cruising on the open ocean. There are frequent course changes, by the minute or even necessitating hand steering. I soon found that that the spot light on Dauntless, mounted on top, forward of the pilot house, did little more than light up the foredeck, thus killing whatever night vision I had.
I found it more effective to stand outside, either in the dark or using a handheld LED flashlight. But when cruising alone, it’s difficult to be both outside the pilot house and steer the boat. The solution, a driving light. They also come in very handy when looking for an anchorage or mooring spot, with other small boats, like a dingy, that may not show up on the radar.
My first driving light for Dauntless was a large Hella (made in Germany) that I hung under the bow pulpit. I was worried about the anchor hitting it as it swung into place, but that turned out not to be a problem.
It got all the way to Ireland and on the second day in Ireland, as we were re-positioning the boat, rafting her to a fishing boat by hand power alone, we managed to punch the lens of the light out, with the anchor of the nearby boat. The light still functioned, so I left it.
Lucky for me, because 11 months later, as I was cruising up a very narrow channel in southern Sweden, looking for an appropriate place to anchor after an exhausting day, that light saved my bacon.
The channel of “deep” water was only about 8 feet deep and Dauntless needed almost 5 of those feet. But the channel was only about 40 feet wide and outside the channel was only three feet. I had already hit two rocks while in Finland. This was not the soft mud of the Eastern U.S. or even the southern Baltic, this was the jagged rocks of Scandinavia (similar to Maine, as they are related geologically).
Two years later
I was terrified. In large part because the channel was marked with non-reflective buoys that were spaced too far apart. In other words, as I passed one buoy, I could not see the next one more than half a mile away. Then I thought to turn on my driving light.
It wasn’t exactly like the sun coming up, but it put enough light down range to pick out the marker buoys. My task became easy and 30 minutes later, I was at the spot on the chart that had deep water off channel, so I could anchor and get some much-needed sleep.
Two years later, the lights are being held on with rust
My driving light was not going to last with a broken lens, letting water get into the housing. Earlier in the year, I had discovered that the replacement lens, was almost as much as the entire light, almost $100. In Sweden, more than half the cars have some sort of auxiliary driving lights. Why? Because it’s dark and for Europe there are a lot of big animals, mostly European Moose, (smaller than the North American version) on the road at night.
I found three large lights for $100. Later in Ireland, I got a few more of those Amazon LED fog lights (5” diameter). Link My Amazon Fog lights
(These lights look like an even better deal for 10 lights, An even better deal
Originally, I also had two 4″ fog (diffuse lens) facing forward. But they turned out to be only marginally effective. Also, during the same trip, I had to anchor just off the channel in Northern Ireland. I left the spreader lights on for increased visibility and I turned the forward fog lights down to illuminate the hull (they only consume 4.5 amps/hr). I then realized they illuminated the anchor chain well as I was hauling anchor. So I left that way ever since.
All these lights are made for vehicles and thus are waterproof, but the weak point are the brackets. They are mild steel and rust quickly. So, one of my winter projects was to replace those brackets with stainless steel.
I realized Vietnam does so much in stainless steel. Every household has numerous items made from stainless steel: kitchen racks, shelves, shoe and coat stands, etc. Therefore, this was the place to have it done.
Ideally, aluminum would be better, since the housing of the lights is aluminum, but that’s more expensive and the Vietnam market couldn’t sustain it. For the same reason, the stainless steel is to specification 304, not the more salt-water corrosion resistant, 316.
My new stainless steel frame and light brackets with the diagram I gave the fabricator.
The language barrier can also be formidable. In my neighborhood, virtually no one speaks English. The stainless shop I found last year did not. But that means the translator, must understand the concepts that are being translated and understand my diagram I drew for the two types of brackets and the frame I wanted made. Trinh was up to the task and two days later, we got a call, saying my brackets were ready.
The frame cost $31, each bracket $3.50.
I’ll be back to Dauntless in mid-March, getting her ready to move north later in the spring and southeast Alaska this summer.
If nothing else, I’ll be able to better see in the dark.